Saturday, December 1, 2012

DIY Gift Idea: Paracord Bracelets

From my experience, it's a lot more difficult to come up with gift ideas for men than for women. So for those of you who, like myself, are struggling with gift ideas for their brothers/dads/boyfriends/husbands, especially this holiday season, here's a gift idea for the outdoorsy/adventurous men (and women) in your life: Paracord Bracelets!

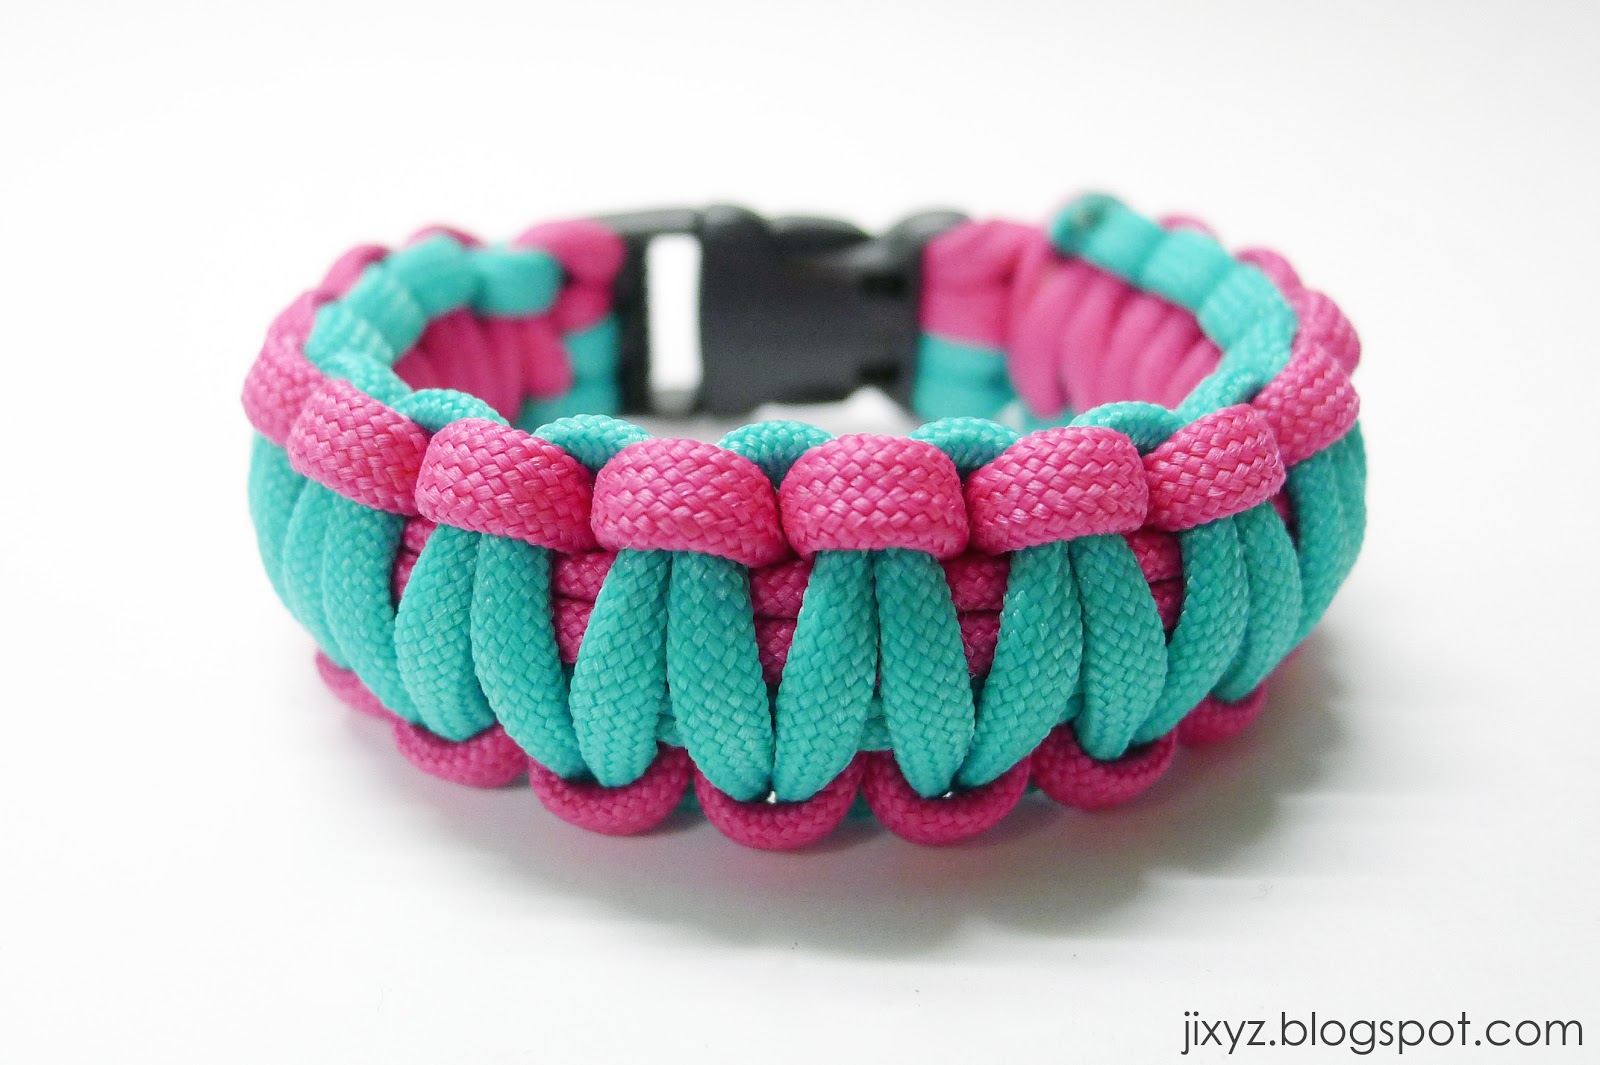
A couple of paracord bracelets I made for a friend.

Paracord, also known as parachute cord, is a type of thin nylon rope that was originally used for, well, parachutes. It's composed of a outer sheath with 7 core strands and typically has a minimum breaking strength of 450 or 550 pounds. Paracord bracelets also go by the name of "survival bracelets". The cord in these bracelets are woven in such a way that one bracelet can contain around 8-14 feet or paracord, more or less, depending on the type of "weave" you use. During emergency situations, like say for broken straps, or a water rescue, or a tourniquet (okay, morbid example, I know) these can be unraveled and you have several feet of cord at your disposal.

Raw paracord with the core strands exposed.

I first heard of paracord bracelets from Dax. I think he saw it on either The Awesomer or Reddit. Now, Dax and I have this thing for giving each other bracelets (we make a lot of those embroidery thread friendship bracelets for each other). When Dax said he wanted a paracord bracelet, I really wanted to get him one, but at that time we couldn't find it in any of the outdoor or sports shops. Once again, I turned to my friend Google and I was able to look up a local online shop that sold paracord by the foot. They also sold ready-made and made-to-order paracord bracelets plus some other paracord creations. But I thought it would be nicer if the bracelet was hand-made by myself, too.

Paracord bracelets are usually woven using macrame braids/stitches. You can make it with or without a buckle. There are a whole lot of video tutorials now on YouTube so I don't think I need to post my own. I do recommend checking out TyingItAllTogether's YouTube channel for tutorials on how to do various knots and braids.

BTW, I get my paracord from The Para Shop Manila. They have quite a selection of colors, too. I made myself a hot pink and electric blue one. Hahaha.

Making my hot pink and electric blue paracord bracelet. Hihi.

Here's another one using a different kind of weave.

Made using half hitch knots.

Recently, a friend asked about Dax's bracelet and after explaining what it was, she thought it was a brilliant idea and asked me to make a couple for her to give as gifts. She says I should make a business out of it. Haha.

Of course, I highly recommend making them yourselves, especially if you're giving them to someone. It just makes it more special.:) But if you don't have the time or patience to do so, you're more than welcome to order from me. Just comment/text/email jika(dot)macachor(at)gmail.com/Facebook or Twitter message me.:)

Mine and Dax's.:)
- Jix.

Monday, October 22, 2012

XL-C Image Plate.


No, I did not free hand these nails. Hehe.

The answer to how I did that design is nail art stamping. If you're not familiar with stamping, it's a method of creating nail art where you apply nail polish to a design etched on metal plate, pick up the design with the stamper and transfer it on to your nail. You can do a Youtube or Google search for "nail stamping" if you want to learn more.

Anyway, I just wanted to share with you guys this image plate (the metal plate used for stamping) I acquired recently. The XL-C image plate. It's the most be-yoo-ti-ful image plate I have ever seen. Ever. I am so in love with it. Just look at it!


See the detail on that?? The designs look Indian/Thai/batik/tribal-inspired. I'm so excited to use all of them! One of the neat things about this plate is that most of designs come with mirror images. So if you're OC with symmetry you'll have no problems with this plate. Also, some of the images have these curved bottom edges which you can use to make patterned french tips. Cool, right?

So you can better see the designs, I stamped all of them on a piece of paper and scanned it. I couldn't get the whole of the design images though. Apparently, each design is too big to fit on my stamper. That's a good thing, IMO. No worries about the design being bitin for your nails!

I got this plate from a stall at 168 Mall in Divisoria for Php 500.00. But I'm so sorry, guys, because this plate I got was the last one in the store and I wasn't able to find it in any of the other nail art stalls. I've tried looking for it online but the local online nail art shops that do sell it are out of stock, too.

If you really want it, I would suggest doing a Google search for it. But be prepared to pay international shipping fees. My plate doesn't really have a brand but I know these kinds of plates also go by the name of Cheeky XL plates. Try searching "XL C image plate" or "Cheeky XL C image plate". Good luck on the hunt! Hehe.

- Jix.

Wednesday, October 17, 2012

DIY Framed Accessory Holder

I used to hang my accessories using these hooks with adhesive backing because I hated poking holes in my wall. But the problem with adhesive hooks is that they would eventually lose their stickiness and fall off, never to stick again. Now my wall is scarred with ugly adhesive residue.

I needed a method of hanging my accessories that would hold up well and be able to cover the adhesive stains on the wall. So I made this:


I can't take full credit for the idea, though. I've seen similar projects on Pinterest and other blogs. I just had to figure out how to DIY it.

This was made around two weeks ago. I've already hung it up, but there was still a section of wall with adhesive residue that was still exposed. So I decided to make a smaller version to cover it up. I also documented the process so I could show you guys how I did it, in case you want to make one yourself.:)

What you'll need:
  • A nice picture frame. 
  • A sheet of cork. Just plain cork. Make sure it doesn't have any backing like wood or hard board or else you won't be able to cut it.
  • Adhesive. I used my spray adhesive for this but I think using rubber cement or wood glue would work just as well, if not better.
  • Box cutter, ruler, cutting mat, and old newspaper (to protect your work area).
  • Fine gauge sandpaper

Where I bought my materials: 
  • Picture frame - My original idea was to find one of those cheap, gaudy, carved, gold frames and spray paint it with a matte white. Surprisingly, those frames were hard to come by. But then I found this one. Though it's made of plastic and not quite as big as I wanted, it was exactly the look I was going for and I didn't even need to do any painting. I got this at the home section of SM Department Store. The bigger frame was, I think, Php 179.75 and the smaller one Php 129.75.
  • Cork - I found the cork in the office supplies section of SM Makati Department Store for Php 64.75. It came in an approximately 12"x18" sheet and was enough for the two frames.
  • The spray adhesive was something I already had from my thesis days. You can get it at National Bookstore or in hardware stores. Rubber cement and wood glue, of course, may also be found in hardware stores.

Instructions:
       1. Remove the backing and the glass from the picture frame.
       2. Trace the shape of the backing onto the cork and cut it out.
       3. See if the cork fits into the back of the frame. If not, trim it with the cutter or sand it down. If you're OC like me, you can sand the ragged edges of the cork (it usually gets ragged when you cut it) to smooth them out.
       4. You'll notice that the cork is a bit thicker than what the frame allows for so what I did was cut little notches in the corners so I could slip in the plastic tabs that held the backing in place.
       5. Apply adhesive on the flat side of the frame backing (the one without the stand and the hanger loops) and stick it on the cork.

And you're done!

I took a cue from my sister and Anj's comments on my Instagram about using earrings as pins for the cork.
I got this set of earrings from AI Online Shop for Php 18.00. I also got bigger ones for my necklaces at Php 21.00 per set. The earring posts were a bit too long, though. So I trimmed them down with a wire cutter and voila!

You can either choose to let the frame stand or hang it up on the wall. I hung mine up using these small plastic hooks with tiny nails in them. (In the photo, you can see the adhesive residue I'm trying to hide)

This is what my accessory "corner" looks like now.
I'm so happy with it! Looks so organized and pretty! Now, for rest of the room.:p

- Jix.

Thursday, October 11, 2012

Personalized.

How do you guys like my new layout? Is the text readable? Hehe.

I realized last night that, without meaning to, my blog design turned out extremely similar to a plate I did for Arch 144 (Color Dynamics) back in college. Look!


Ayayay. My tastes are so predictable. Not necessarily a bad thing, I guess? At least, I'm consistent. Haha.

On a side note, that up there was the very first 3D model I created on Sketchup. I used the plate to practice. Apologies if it seems rough and kitschy. Hehe. The rendering was done by Dax, BTW, using VRay.:)

Anyway, to give credit where credit is due with regards to my layout:
  • My header was created using photoshop brushes from the tropical brush set by Mel of Mels Brushes
  • The wooden background was originally white. I just colorized it on Photoshop. I found the background image through a Google image search which took me to this page. I don't know who exactly to credit, though. Sorry.

I'm still trying to get the hang of designing this blog. I know it's not much, but I think I actually like the simplicity of this layout I came up with.

Blogger friends, what Twitter widget do you use? I'd like to add one to my sidebar. What other blog widgets would you recommend (i.e. Pinterest, Instagram, etc.)? Help me! I am such a n00b. Haha. Would appreciate your comments/suggestions.:)

- Jix.

Monday, October 8, 2012

Braided Nail Design Tutorial.


Those of you who follow me on Instagram have probably already seen this.

As I've said, this is my first manicure in over a month and I wanted to do a design that would 1) showcase how pretty Orly "Luxe" is, 2) be in line with the "Pink October" theme (October is breast cancer awareness month for those, like Dax, who don't know -_-) , and 3) look good on short nails (since I've been cutting my nails to the quick to get rid of any unhealthy nail asap).

So I thought, what better way to tie that all together than to do a braided nail design! Heh. See what I did there? Eh? Eh? *nudge nudge* Tie it in... Braid... Get it? Aaaanyway...


This is actually a pretty popular design, as of late. It's been making its rounds on the nail art blogosphere. I think it's because it looks intricate but is fairly easy to do and you don't need any special tools to do it. I'll show you how.

First, pick three colors. The colors that I used for my manicure were Orly "Luxe" (of course), Caress "Pleasure" and Caress "Rose Beige", pictured below.

Orly "Luxe", Caress "Pleasure", and Caress "Rose Beige"

Now, on to the design tutorial. Just use the brush that comes in your nail polish.

Braided Nail Art Design Tutorial.

See? Pretty simple, right? Just keep applying the colors in sequence. You don't need to follow the exact number of strokes I made. Then, clean the edges and apply topcoat when you're done.

BTW, please excuse my crude methods, but that's really how I do my concept and practice nail art -- on acetate.-_- Methinks I should get some of those fake nails if I want to do more of these nail tutorials. Hehe.

Just some tips for this design:

  • Wait for each color to dry before applying the next color. This is the only drawback to this design -- it takes time. I would suggest doing one color on all of your nails, then do the next color, apply on all of your nails, and so forth. That way the polish will have semi-dried on the first nail by the time you move on to the next color.
  • As much as possible, choose polishes that are opaque in one stroke so you don't have to go over them again before moving on to the next color. In my case, it took me a little more time to do this design since the pink colors needed two coats for opacity.
  • This is just my opinion, but I think selecting one pearly or metallic color to go with two creme colors really accentuates the design. Three cremes is fine, too. But more than one "bling-y" color may be overkill. Hehe.

That's it. I hope you guys liked this. Show me if you decide do this design on your nails! And if you see any of my nail designs you'd like to learn how to do, tell me and I'll post a tutorial here.:)

- Jix.

Orly "Luxe" + Comeback Nail Art.

Orly "Luxe".

Such a pretty gold, don't you think?

I spotted this while looking for a nice gold polish color to use for stamping. I wanted one that wasn't too yellow or too bronze, and I think Orly "Luxe" was just that. It's a shimmery metallic gold with some silver micro glitter mixed in to "cool down" the color. It has a foil-like finish when applied.

I didn't purchase this right away since I was holding out for China Glaze's "2030". But since I couldn't find 2030 anywhere, I got this instead.

It had been sitting on my dresser for weeks before I finally got to use it. Not that I wasn't excited. In fact, I was just itching to do some nail art with it. But I was giving my nails a break from polish. They were becoming unhealthy and started getting the equivalent of split ends where the top layer of nail started chipping and peeling. Yikes.

After a little over a month of naked nails, I finally deemed them healthy enough to be painted again and here's what I came up with:

Braided nail art with Orly "Luxe".
Of course I had to reserve one whole fingernail to be painted gold. Hehe.

I bought Orly "Luxe" at SM Makati for Php 349.75.

Oh, it stamps pretty well, BTW. You might still be seeing this in my next nail art posts. I have the most beautiful nail art stamping plate to show you!

I've also prepared a tutorial for how I did that braided design above. If you're interested, check back in a few hours.:)

- Jix.

Monday, September 24, 2012

Recent online shoe haul.

So I went a liiiittle shoe crazy a while ago. Remember I mentioned in a previous post how my obsession comes in waves and that, at that time, it was shifting to shoes? Yeah. I bought four pairs of shoes after that. Two pairs of flats and two pairs of heels. All in the span of less than a month. Yikes.

Clockwise from top: Hot pink peep toe pumps, rose pumps, cream captoe flats, pink ballet flats

I got all of these online. I'll post links to the shops where I got them. You'll see the prices when you click the links. I'm kind of afraid to admit how much I spent on all of these.T_T Each pair is actually relatively affordable, though. Let's just say, collectively, the lot of them cost as much as a decent pair of running shoes.

Hot Pink Peep Toe Pumps
Photo credit.
Got this pair from FashionCookie ShoeAvenue. These are probably the highest heels I have. Almost 6 inches high!o_O They'll definitely get uncomfortable if you stand/walk in them for long periods of time, but they don't pinch or rub anywhere. Which is why I like suede shoes. They're so easy on my feet for some reason. However, with the weather lately, I've been having a hard time finding the chance to wear these babies. I'm scared they'll get ruined by the rain. >.<

Pink Ballet Flats
Photo from Suelas.
This is Suelas's Llanura in "Tutu Pink". They're foldable and come with a pouch you can tuck the shoes into. Actually, I already owned the exact same pair before this recent purchase. They were my most used and abused flats. And I loved them so much I just had to get another pair when they finally gave up on me. I hope Suela's doesn't stop producing these. I will be heartbroken if they get discontinued. Hehe.

Cream Captoe Flats
Photo from Satchi Store.
These are Satchi Store's Vivi Captoes in cream. I bought these to use alternately with my Suelas Llanuras so I don't wear them out too quickly (yes, that's how much I love my pink flats). Satchi Store boasts of "unbelievable sneaker-like comfort" from their shoes. Yes, the shoes are very soft, buuut the lining is a bit scratchy. I'm quite sensitive when it comes to the itchies so this was kind of a disappointment. What's even more disappointing is that I think all of their shoes are like this. I own another pair from this store (the Kochi Loafers), and I had to line the front part of those shoes with Leukoplast cause I couldn't bear the scratchiness. Thankfully, the construction of the Vivi Captoe makes the lining more bearable. 

Rose-colored Pumps
Photo from Shoe Goddess.
When I saw these pumps on Shoe Goddess (aka HighStyleFancy), it was love at first sight. But I'd already purchased the three previous shoes I mentioned so I told myself I really didn't need another pair. But I kept going back to the site just to look at them and sigh. I made a little bargain with myself, that if the shoes were still there by the end of October, I'd get them. And then Multiply held one of their "Discount Frenzies" for shoes. All that bargaining went out the window. I snatched up those shoes with the discount code and got Php 500.00 off. Mwahahaha! I fail the Marshmallow Test.-_-

I'm pretty much over my shoe phase for now. Sana naman, diba? Hahaha. My current obsession has shifted to organizing. I'm on a mission to de-clutter my room. I've been buying containers, holders, and organizers, left and right. Ayayay. Progress is slow and I still have a long way to go, but I'll show you the results once I'm all done.

- Jix.

Sunday, September 23, 2012

My Unii Palette.

Ha! Finally. Overdue post.

Like I said the Unii Palette was the main catalyst for my starting this blog. I finally got it and have already been using it for the past three and a half weeks, but I'd become pretty busy lately and haven't really been able to sit down and write about it yet.

So without further ado...

What is a Unii Palette?


The above video pretty much explains it all. Put simply, it's a makeup storage case. It opens up like a compact with a mirror on the top panel. The bottom panel is magnetic where you can stick pans of makeup which have been removed from their original containers. I won't go into it so much since all the info's on their website and there are tons of detailed reviews out there.

What attracted me to it was the fact that I could consolidate all the different brands and types of makeup I had into just one portable case. Perfect for travel.

When I first heard about the Unii, it was only available for purchase online from their site. Shipping cost to the Philippines pretty much turned me off of the thought of purchasing one.

Some time later, I don't remember why, I randomly Googled "unii palette philippines" and.... tadaaa! A couple of local online shops were selling it. I got mine from La Petite Confiserie for Php 1000.00 + Php 50.00 shipping, which is kind of cheap considering that Unii sells it on their site for US$ 29.00 without shipping.

I know it's not cheap for an empty plastic case, but this is such a cool product! Ingenious! I haven't seen anything like it (well, there's the Z-palette -- same concept but it's made of cardboard). I wanted it so bad I was willing to shell out the money for it.

The latest "edition" of the Unii Palette comes in 6 colors. The pastel ones are just soo adorable, I wanna cry. Hehe. I wanted to get the turquoise palette (most of you know how obsessed I am with this hue), but since I told myself I need more variety in my color selections, I got the Honeysuckle one instead. My heart still aches for the turquoise one, though.T_T Pag tinopak ako, bibilhin ko yun. Hahaha.

The Unii Palette in pastels, and basic white and black. Image from Unii.

Like I said, I've been using this for a little over three weeks now and I have nothing but love for the Unii. I just looove the convenience of it all. I can do my makeup in the office when I'm running late. And I can do it using all my favorite products without having to tote around this huge palette and a bulging makeup bag. It holds up really well, too. I've tossed it into one of my big hobo bags where everything gets jumbled and jostled around, but the case and my makeup were all still intact.

Cons? The depotting process was pretty messy. I broke some of my makeup (mostly because I'm a klutz and dropped the pans *headdesk*). I also had to destroy some of the original containers by way of melting the plastic, just to get the pans out. But it's all good. I'm so happy with the end result!

Here's what the inside of my Unii looks like:


There I have several eye shadows (14 to be exact), one blush, a contour color, a highlight color and a lipstick I depotted and melted into an empty rectangular pan, plus a couple of small makeup brushes.

In some reviews, people have complained that they feel the Unii Palette is too small. But I think it'll only be too small if you're thinking of using it as a regular storage compact or if you're the type of person who cannot pack light and wouldn't be comfortable bringing only a few makeup pieces. However, to me, it's just the right size. I need it for it's portability. I have my go-to everyday makeup looks established, so everything I need for that is in my Unii. I can already do six eye makeup looks with what I have in there! If ever I want to do something different it wouldn't be difficult to just switch up the colors.

Unii is in the process of designing a bigger palette for their next release, though. So that's something to watch out for.

- Jix.

Saturday, September 1, 2012

On not scrimping when it comes to skincare.

Okay, I concede. As much as I want to tell you guys that you can get the same results from cheap skicare products as the high end ones, I've learned that investing in high quality, albeit expensive, skincare products does make a difference. I haven't tried many of the high end brands, but from what I have tried, I can say you do get your money's worth when you choose to spend on skincare, especially for the face.

Yes, there are the select few who were blessed with skin so perfect, they can get away with just washing their faces with plain, bar soap (or so they claim). However, the lot of us may need more care than that. I know I do.

I'm lucky I have a skincare benefactor in the form of... drumroll please... MY DAD. Yep, my dad is probably more vain than all us girls in the family. He's the one who keeps lecturing us on always, always using sunscreen everyday (boy, do I get an earful whenever I go to the beach), telling us to follow the three-step skin care routine (cleanse, tone, moisturize), and warning us not to rub or stretch the skin on our faces lest we get wrinkles. It's pretty funny. But what the heck, if he's willing to fund our pursuit of good skin, who's complaining? Haha.

My dad was the one who provided me with Clinique's 3-step skin care system and Super City Block (facial sunscreen). My initial thoughts were, "Whyyyy are you spending so much for this?! We could've used the money for better things!" I honestly didn't see the point. But I used the products anyway.

It wasn't 'til a few months later, as I was sorting old photos, that I noticed how much of a difference there was in the quality of my skin. In the old pictures I had such uneven skin and a lot of tiny blemishes. I'd thought my skin was okay since I didn't break out in splotches of acne or anything. I thought a few bumps were normal. I didn't know it could be much better.

Before
Now

The "before" picture is o-l-d. Like 4 years old. I stole it from Dax's Multiply since I couldn't be bothered to search through the virtual baul in my external hard drive. Haha! I think this was taken a few months before my dad started giving me the Clinique products. Take note: that's a low res photo, and I already had powder foundation on (it's a photo of me doing my makeup, hehe). I shudder to think how it would have looked in HD.o_O The "now" photo was taken a couple of hours ago -- no makeup, freshly cleansed, toned and moisturized face. Excuse the pores, it's a macro shot of my forehead. MACRO. Click the photo to zoom in. That's how much clearer my skin's gotten after a few years of proper skin care. Thank you, Dad!

My dad also gets all these samples of beauty/skincare products (because of his work) and passes them on to us to try. I'm continually amazed that there are products that produce noticeable results overnight or even instantly after application! Examples are the Clinique Turnaround Concentrate and the Laneige Water Sleeping Pack (which I just tried out last night, thus inspiring me to write this, hehe). Of course, they come with pretty hefty price tags, but it's just proof that you get what you pay for.

So yeah, if you have the moolah to spare, invest in your skin care products. If not, at the very least, try to stick with the 3-step, cleanse-tone-moisturize regimen in the morning and evening. Find the best products, within budget, that work for you.

And just so this isn't all about expensive skincare, here's my cheaper version of the 3-step program for the times I run out of my Clinique stuff before Dad replenishes my stocks, hehe:

I didn't take note of how much these cost, but I'm pretty sure none of these is over Php 200.

Disclaimer: We all have different skin, so please remember that what works for me may not work for you.

Wow, this certainly seems to be transforming into a beauty blog. Hahaha. I should start writing about other things. My fixations come in waves and cycles. It's been beauty lately. Now it's shifting to shoes (again). Hahaha.

- Jix.

P.S. I also highly recommend getting a good eye cream. Not sure if it's noticeable to other people but I feel like it makes my eyes look less old and tired. Plus it really improves the texture of the skin around the eyes. My heart sinks a little whenever I run out of the Clinique eye cream samples since those samples are a bit hard to come by.

Tuesday, August 28, 2012

HG Nude Nail Color: Caress Cyclamen Pink

Ever since I got into nail art, I've had some new design on my nails almost every week. But I'm pretty conservative with my toe nail colors. Doing those mint toe nails a few weeks back was actually a new thing for me.

Instagram shot of my minty toes.

I still prefer having shades of pink on my toes. My favorite toe nail colors are those pink-nude kinds. I'd always been in search of a perfect "my-nails-but-better" shade and I found it a few months ago, from a local brand no less!

Caress Cyclamen Pink

This is Caress in "Cyclamen Pink". I tried my best to adjust the photo's color balance to mimic what the color looks like in real life. I don't know how it would look on your screen but I think you can tell how flattering this shade is against my skin. In the bottle, it's not very pretty or remarkable, to be honest. It looks like an old rose pink with grayish undertones. I'm not even sure why I picked it up in the first place, but I'm so glad I did. It's the perfect nude for my skin tone -- not too pale, not too brown. I'm wearing two coats in this photo.

This color usually goes on my toes, but I used it on my nails this time since I'll be attending a formal event later. No crazy nail art. I might have some fun with it after tonight though. Hehe.

Caress nail polishes are sold at most department stores but they don't carry all the colors, all the time. So there's a chance you might have to visit more than one store if you're looking for a specific shade. The most comprehensive "collection" I've found is at Cash n Carry Makati. This particular one, however, I got from Landmark Makati for Php 22.75 (as you can tell from the price tag, haha).

- Jix.

Sunday, August 26, 2012

Because those boyfriend tags are so cute.

Me: Hun, gawin natin yung "my boyfriend does my makeup"! Sige naaaa...
Dax: Whyyyy? Ano ba naman ang alam ko diyan?
Me: That's the point! It's funny! Sige na. Then we can do "my girlfriend fixes my car"!

Hehehe.

What I want to put in my Unii: A Makeup Review

Awww. My Unii Palette didn't arrive today because, according to the seller, the courier wasn't able to pick it up in time. Oh well. No big.

So for now, I'll just show you what I plan to put in my Unii and give a short review on each of them.

First up: my unbranded 78 color makeup palette. I got this sometime around Christmas last year. It's very similar to the one being sold by Coastal Scents (they're probably the exact same thing, just rebranded). Many online beauty stores sell these kinds of palettes along with the more popular 88 color palettes. The one I got comes with 72 eyeshadows and 6 blushes.

Google image search result from here.

Checking the Multiply Marketplace, I've found that the price range for this one runs at around Php 750-900. Some sell it for much higher but I don't recommend getting those since I think they're all the same, really. Mine was a steal. I got it on sale for only Php 550 but I can't remember where (I'm so sorryyy T_T). I do remember that the seller was Cebu-based so I got free shipping when I asked them to ship it to our house in Cebu. Good deal!

Just a side note: Yes, I like makeup, but I'm not obsessed enough to blow all my money on it. I'm a real cheapskate, in fact. Though I wouldn't buy something just because it's cheap, I try to look for the best value for money and I (almost obsessively) look for the best deals. Very rarely, I will splurge on something, mostly because I hear rave reviews about it. As in RAVE REVIEWS -- like the whole beauty blogging world is talking about it (ex. Revlon Lip Butters). Lately, I've been constantly checking local availability for the Urban Decay Naked Palette. But I just can't bring myself to spend Php 3,000 for a set of eyeshadows, no matter how pretty they are and how much the beauty world loves it.*sigh* Maybe someone can gift it to me.*ehem ehem* Hehe. For now I shall content myself with my el cheapo palette, which we shall be getting back to.

Google image search result from here.

Aaaanyway (I rambled, sorry)... As for the quality of the 78 color palette, it's kind of hit-and-miss with this one. Some of the eyeshadow have good pigmentation, particularly the shimmers and the bright colored ones. The rectangular shadows are especially good (love those). Some of them need to be applied heavily for the color to show. And there are one or two that don't even show up at all. It's like I didn't even pick up any powder. Maybe it's just because the color was too close to my skin color? I dunno. The blushes are okay. My favorite is the third one from the left. The other blushes are either too light or too shimmery. I'd like to post swatches and actual photos but the camera is with Dax. Maybe later.

This palette is the main reason I want the Unii. The 78 color palette is far from compact (a little bigger than 9"x6.5"). I love some of the colors but obviously don't use the others. It's a pain to bring all of it around. I used this palette for my Oath Taking makeup and had to bring the whole freaking thing for touch-ups. I left it in the car.-_- When I travel, I have to settle for some of my smaller eyeshadow compacts whose colors I don't like as much. With the Unii I can just depot my favorites and bring just those. Pwede na ba kong pang-marketing ng Unii? Hahaha.

Let's move on to the next item on my list. This one was definitely a splurge for me. I got the Tarte Amazonian Clay 12-Hour Blush in "Exposed" from Stuff in Style for Php 1,200. Yeah, 1,200 smackers for one single blush. But this was one of those rave-review items that I was able to convince myself to buy because people kept saying that when they tried this, they didn't want to use any other blush anymore. And I rationalized it by telling myself it'll last me a long time. Heh.

Photo from Tarte's website.

I can say this is a really good blush. Beautiful texture and quality. Even the way it looks in the pan -- so pretty! "Exposed"is a matte brownish/nude pink and looks very natural on my skin tone. However, sometimes I feel like it's too natural looking. I think it's because I'm used to the pinkness of my trusty Ever Bilena lip and cheek stain. I'm not sure about the 12-hour wear time either. When I apply it in the morning, by mid-afternoon I feel like my face could use more color. But again, maybe it's because it's too natural looking.

I'm a wee bit bummed that I'm not super happy about something I spent so much for. Maybe I should have gotten a pinker shade instead. It gives a very nice, subtle contour to my cheeks, though. I think the color "Exposed" would work well for fairer skinned individuals or for the "no-makeup makeup" looks on those with medium skin. I do like it enough for it to go into my Unii, so there.

The last item I'll be talking about is the "Nose Shadow" from Saizen (you know, that awesome Japanese store where everything is priced at Php 85). Another one of my cheap finds which I got for, well, Php 85. It's a compact that contains a brown contour color, and a white highlight color.

Photo from Saizen's Multiply site.

In the pan, you can see that the brown has some shimmer to it, but when applied it's not noticeable at all. I use the brown to contour not just my nose, but my cheeks, forehead and chin, as well. The white, I apply to the bridge of my nose, brow bone, and the inner corners of my eyes. The lids of these things keep breaking off on me, though. So once again, I'm happy I can depot this and place it in a more secure container. Hihihi.

When I finally get my much-awaited Unii, I'll probably write about how I'm going to depot everything, too. I'm a bit nervous, about depotting my favorite eyeshadows 'cause I don't want them to break in the process. Here's to hoping they all survive.

- Jix.